
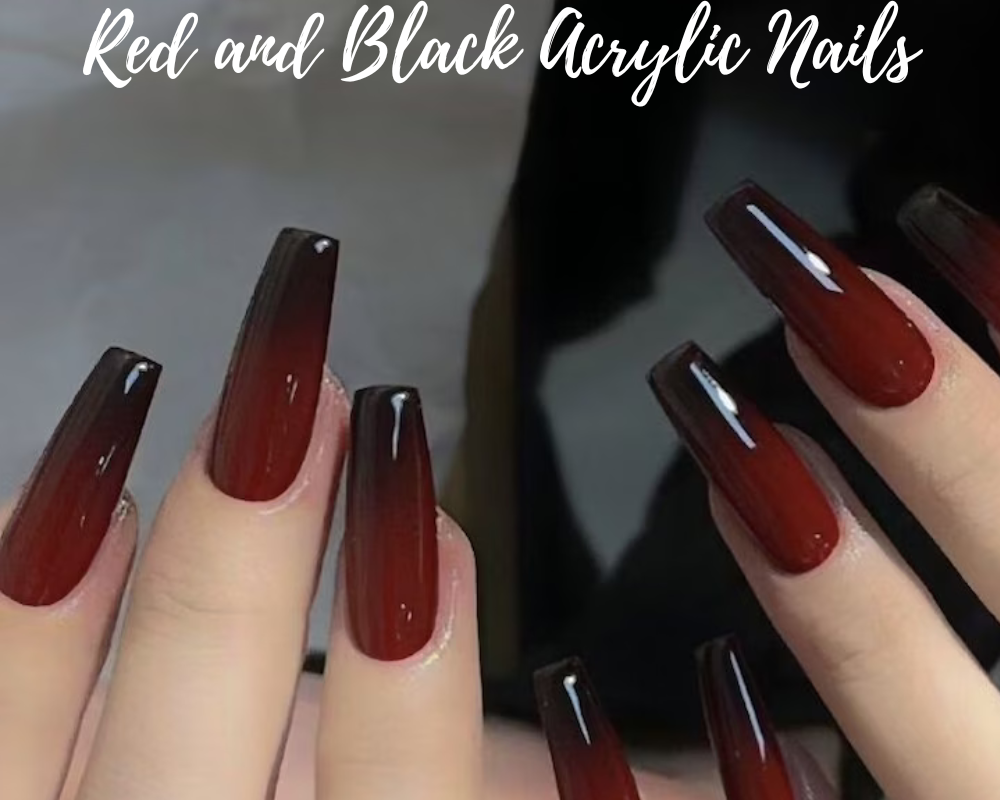
Red and black acrylic nails are a stunning and bold choice for nail enthusiasts. Whether you want to make a statement or add a pop of color to your look, these nails can be a great choice. However, applying acrylic nails can be tricky, especially if you’re new to the process. In this guide, we will walk you through the steps to apply red and black acrylic nails perfectly.
Table of Contents
Red and Black Acrylic Nails Brief Review
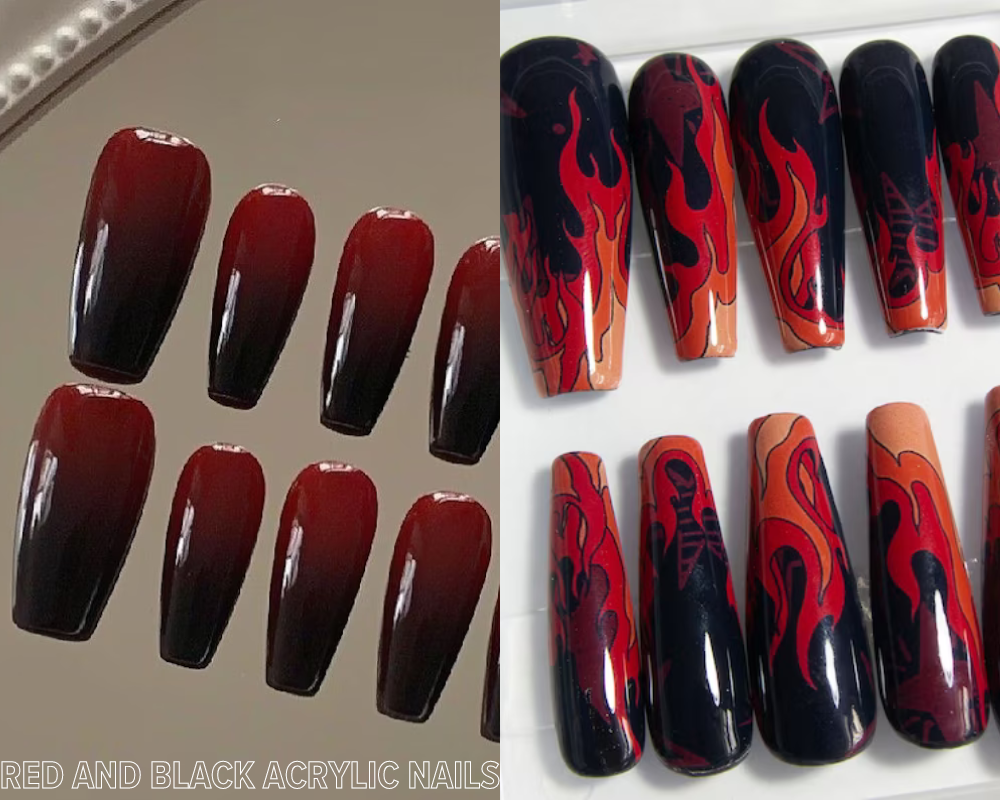
Red and black acrylic nails are a popular choice for those who want to make a bold and stylish statement with their manicure. These colors offer a wonderful contrast that can complement a variety of outfits and occasions.{ Acrylic nails}, in general, are artificial nails that are applied to natural nails using a mixture of liquid and powder. They are known for their durability and ability to be customized with different shapes, lengths and designs.
The combination of colors allows for endless creativity and customization when it comes to red and black acrylic nails in particular. Whether you prefer a classic red and black French tip design, a sleek and modern geometric pattern, or a glamorous glitter accent, red and black acrylic nails offer versatility and sophistication.
To achieve perfect red and black acrylic nails, it’s important to choose high-quality products and follow proper application and maintenance techniques. With the right care, red and black acrylic nails can last for weeks, making them a popular choice for those looking for a long-lasting and stunning manicure option.
Preparing Your Nails
Before you start applying acrylic nails, it’s important to prepare your{ natural nails properly}. Start by cleaning your nails thoroughly to remove any dirt or oil. Next, trim and shape your nails to your desired length and style. Once your nails are clean and shaped, apply a base coat to protect your natural nails from damage.
Cleaning and shaping your nails
Properly cleaning and shaping your nails is an important step in preparing them for acrylic nail application. Follow these steps for clean and well-shaped nails:
1. Remove old nail polish: Use a nail polish remover to completely remove any existing nail polish.
2. Trim your nails: Use nail clippers to get the desired length. It’s best to start with longer lengths and trim them gradually to avoid cutting them too short.
3. File nails: Use a nail file to shape your nails. File them in one direction to prevent breaking or damaging the nail.
4. Buff nails: Use a nail buffer to smooth the edges of your nails and remove any ridges. This step helps create a smooth surface for the acrylic nails.
5. Soak your nails: in a warm, soapy water solution for a few minutes to soften the cuticles and clean them of any dirt or debris.
6. Push back the cuticles: Use a cuticle pusher to gently push back the cuticles. Be careful not to bite them, as this can lead to infection.
7. Clean under nails: Use a nail brush to clean under your nails and remove any remaining dirt or debris.
8. Dry nails: Dry your nails with a clean towel before proceeding with the acrylic nail application process.
By following these steps, you can ensure that your nails are clean, well-shaped, and ready for acrylic nail application.
Applying red and black acrylic nails
. To apply red and black acrylic nails, you need to start by choosing the right acrylic nails for your desired look. You can get acrylic nails in different shapes and sizes, so make sure your natural nails fit well. Once your acrylic nails are done, apply a small amount of acrylic adhesive to the back of the nail and press it onto your natural nail. Hold the nail in place for a few seconds to allow the adhesive to set.
. Applying red and black acrylic nails requires attention to detail and precision. Follow these steps for a perfect application.
1: Gather your supplies: You’ll need red and black acrylic nails, acrylic adhesive, a nail file, and a cuticle pusher.
2: Groom your nails: Make sure your nails are clean, dry and free of old polish. Gently use a cuticle pusher to push back your cuticles.
3: Choose the right nail size: Choose the right size of red and black acrylic nails for each of your natural nails. It is better to choose a size slightly smaller than larger.
4: Apply Adhesive: Apply a small amount of acrylic adhesive to the back of the acrylic nail.
5: Apply the acrylic nail: by pressing it onto your natural nail, starting at the cuticle and working downwards. Hold it in place for a few seconds to let the adhesive set.
6: Trim and Shape: Use a nail clipper to trim the acrylic nail to your desired length. Next, use a nail file to shape the nail to your liking, such as square, round or almond.
7: Smooth the edges: Use a nail buffer to smooth any rough edges and make sure the acrylic nail blends seamlessly with your natural nail.
8: Repeat for all nails: Repeat the above steps for all your nails, applying both red and black acrylic nails as desired.
9: Apply Top Coat: Once all of your acrylic nails are applied and shaped, apply a top coat to seal and shine the nails.
10: Cure the nails: If you’re using a UV or LED curable acrylic adhesive, cure your nails under a lamp according to the manufacturer’s instructions to make sure they’re fully set and secure. .
By following these steps, you can achieve a flawless application of red and black acrylic nails for a bold and stylish manicure.

Shaping and Buffing
After applying all of your acrylic nails, it’s time to shape them and polish them to perfection. Use a nail file to shape your nails to the desired length and style. Be sure to file gently to avoid damaging the acrylic. Once you’ve shaped your nails, use a buffing block to smooth out any rough edges and create a smooth surface.
Buffing nails for a smooth finish
>Buffing the nails is an essential step in the acrylic nail application process, as it helps to remove any imperfections and create a glossy finish. How to buff your nails for a smooth finish:
Choose the right buffer: Choose a fine grit nail buffer to avoid damaging acrylic nails.
Buff the nails gently: Use a buffer to rub the surface of each nail back and forth. Avoid applying too much pressure, as this can thin the acrylic.
Pay attention to the edges: Pay special attention to the edges of the nails to make sure they are smooth and blend well with the natural nail.
Remove any rough spots: If you encounter any rough spots or uneven areas, continue buffing until the surface is smooth and even.
Buff the entire surface of the nail: Buff the entire surface of each nail to create an even finish.
Check for smoothness: Run your fingers over the surface of the nails to check for smoothness. If you notice any rough spots, continue buffing until the surface is completely smooth.
Clean nails: Use nail cleanser or rubbing alcohol to clean nails and remove any dust or debris from buffing.
Apply a top coat: Once the nails are buffed and clean, apply a top coat to seal and shine the nails.
By following these steps, you can smooth and polish your red and black acrylic nails, and ensure a professional-looking manicure.
Adding design and accents
A fun part of having red and black acrylic nails is adding designs and accents. You can use nail polish to create intricate designs or add accents with nail stickers or decals. Get creative and experiment with different designs to create a unique look.
The finishing touches
To finish off your red and black acrylic nails, apply a top coat to seal in the design and add glitter. You can also cure your nails under a UV or LED lamp to make sure they are fully set and protected.
Care tips
To keep your red and black acrylic nails looking their best, it’s important to take proper care of them. Avoid using your nails as tools and be gentle when performing tasks that could damage them. Additionally, moisturize your nails and cuticles regularly to keep them healthy and hydrated. With proper care, your red and black acrylic nails can last for several weeks.
Result
Finally, red and black acrylic nails are a stylish and attractive choice for nail enthusiasts. By following these steps, you can apply red and black acrylic nails perfectly and enjoy a beautiful and long-lasting manicure.
Frequently Asked Questions
How long do red and black acrylic nails last?
Red and black acrylic nails can last 2-3 weeks, depending on how well they are cared for and your daily activities. Proper care, such as avoiding using your nails as tools and moisturizing regularly, can help extend the life of your acrylic nails.
Can I remove red and black acrylic nails at home?
Although it is possible to remove acrylic nails at home, it is generally recommended that you have them removed by a professional to avoid damaging your natural nails. If you choose to remove them at home, you can soak your nails in acetone nail polish remover or use an acrylic nail removal kit following the instructions.
Are red and black acrylic nails safe for natural nails?
When applied and removed properly, acrylic nails should not damage your natural nails. However, improper use or removal can cause damage to the nail, such as thinning or weakening. It is important to follow proper nail care practices and avoid overuse of acrylic nails to keep your natural nails healthy.
How should I store my red and black acrylic nails?
To store your red and black acrylic nails, keep them in a cool, dry place away from direct sunlight and moisture. You can store them in a nail kit or container to prevent them from getting damaged or losing their shape.
Can I swim or shower with red and black acrylic nails?
Swimming or bathing with acrylic nails is generally not recommended, as prolonged exposure to water can weaken the adhesive and cause the nail to lift or break. If you need to take your nails out of the water, such as when swimming or showering, it’s important to wear waterproof gloves to protect your acrylic nails.

1 thought on “Red and Black Acrylic Nails How to Apply Perfectly”